Download & Install
The ubermix image will work on almost any device (laptops and desktops) although there are issues with some models. Be sure to read this entire page before you install for important notes and details. If you are looking at small laptops but have not yet selected a model, we are presently recommending the Acer TravelMate B3 Series, Lenovo 100e, or the Ideapad 100 series. Obviously, ubermix will work well on any device capable of running Windows, however these are the models we see used most often.
Try ubermix:
Download the VirtualBox virtual appliance image for use on Windows, Mac, or Linux
If you would like to try out the ubermix without actually installing, you can use Virtualbox (free), which you can download from here. Please note: this VM requires at least version 5.0 of VirtualBox. Once installed, download one of the following virtual appliance files:
If you have Virtualbox properly installed on your machine, you should be able to double-click the Ubermix.ova file when the download is complete to install. You can also open VirtualBox and choose "Import appliance" from the "File" menu. See the Virtualbox instructions for further details.
Install ubermix:
Download the install image for Netbooks/Laptops/Desktops w/ 1Gb+ RAM
The ubermix is a custom install that requires a 8Gb or larger USB key. There are currently multiple versions of the ubermix available for download:
- Current release (6.x) based on Ubuntu Jammy Jellyfish 22.04
- Prior release (5.x) based on Ubuntu Focal Fossa 20.04
- Prior release (4.x) based on Ubuntu Bionic Beaver 18.04
All image files are located on the Download Files page.
Important Note: For model specific issues and configuration instructions, see the section at the bottom of this page.
Follow @ubermix on twitter or join the mailing list to keep up with the latest news, updates, and related content.
Creating the USB Key
The easiest way to create a USB key from the downloaded file on any platform is to use Etcher, which is availble for free. If you would like to create the image the manual way on Mac or Linux, please follow the instructions below:
Linux
- Determine where the image file was saved when you downoaded it from the web site. It should be in the root of your Home folder. If not, move it there.
- Insert your 8Gb+ USB key in any available USB port on your machine. Most Linux systems will automatically mount the key.
- We need to find out what disk the system assigned to the key. To do so, open up a terminal (usually under "Accessories") and type "mount" followed by the enter key. In the list of disks that appear, you should see your USB key at the bottom, listed as "/dev/sd*1" where * is probably a,b,c,or d.
- Next, unmount the USB key by typing "umount /dev/sdX1" (replacing "X" with the letter you saw in the list on step 3)
- Finally, type in "sudo dd if=ubermix-key6.20.img of=/dev/sdX" ("sudo dd if=ubermix-key5.44.img of=/dev/sdX" for ubermix 5) followed by the enter key, where "X" is the letter you determined in step 3. If you will be installing a different release, replace "ubermix-key6.20.img" with the name of the image file you downloaded. When the command completes, you will have a USB key that is ready to boot and install ubermix on your device.
Mac
- Determine where the image file was saved when you downoaded it from the web site. Macs usually store downloaded files in the "Downloads" folder, which is in your home folder. Firefox often saves downloads in the Desktop. Move the downloaded image to your home folder.
- Insert your 8Gb+ USB key in one of the USB ports on your Mac.
- Switch to the Finder and open the "Utilities" folder (Go -> Utilities)
- Open "Disk Utility"
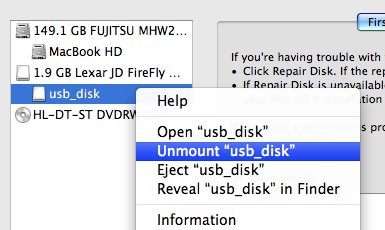
- When Disk Utility opens, locate your USB key in the panel on the left of the window. You will see two items in the list: the key itself ("Lexar" in the example below - yours will probably be different), and the volume that exists on the key ("usb_disk" in the example below - yours will probably be different). Ctrl-click on the volume ("usb_disk on the example - yours will be different) and select "Unmount"
- Close the Disk Utility, and Open "Terminal" in the "Utilities" window
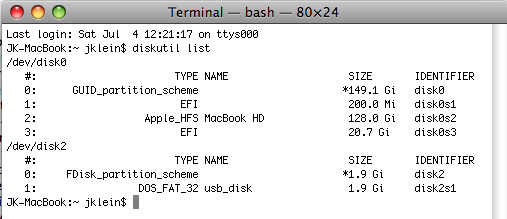
- Type "diskutil list" in the terminal window, and look for your USB key in the list. The detail we are looking for is which device it is ("/dev/disk2" in the example below)
- Once you have determined which device it is, type in the following: "sudo dd if=ubermix-key6.20.img of=/dev/diskX" ("sudo dd if=ubermix-key5.44.img of=/dev/diskX" for ubermix 5) replacing the "X" with the disk number from step 8. If you will be installing a different release, replace "ubermix-key6.20.img" with the name of the image file you downloaded. When the command completes, you will have a USB key that is ready to boot and install on your device. Note that my experience has been that Macs do this rather slowly, for some reason. If you plan to make multiple keys, create one on the Mac, install on a device, and then use the device to make additional keys.
Installing on your System
Instructions for booting a system from a USB key will vary from system to system, so you will want to consult the manual that came with your system if the following instructions do not work for some reason.
Please note: If you are installing on an older machine that will not boot from a USB key, see CD Install on the ubermix wiki
Warning: If your device has never had the ubermix installed on it, this process will erase everything on your device. If there is anything on it that you want to keep, you will want to back it up prior to performing the following steps. Devices that already have ubermix on them can simply be upgraded, with no loss of user files.
- If your device is turned on, shut it down first.
- Insert the USB key you created in the prior steps, and press the power button on your device.
- When you see a splash screen press whatever key is appropriate for your machine to show the boot menu. For Asus EeePCs and HP Mini it is usually escape, for Acer or Dell it's usually F12. On some machines (Acer, in particular) the boot menu is not enabled by default. To enable it, enter the BIOS settings (F2 at startup on Acer) and look for an "F12 Boot Menu" option to enable.
- Select the USB key from the menu and press the Enter key on your keyboard
Please note: modern systems released within the last few years may be a little more complicated to get setup. If you experience problems and suspect it might be related to the "newness" of your hardware, see the section on "(U)EFI" under "Troubleshooting - Model Specific Issues and Instructions" below.
In a few seconds, you will see a menu containing installation options, as follows:
- Easy image
- Advanced image
- Apply simple updates
- Fast image (both 1 & 2, format user home, no prompts)
- Expert Options
Understanding the options:
When designing this setup, the concept behind the installation process has been to create a general base installation, represented by the "install" or "image" options, and then add on a mechanism for customizing the base installation easily, which is represented by the "simple updates" options. Option 1 or 2 is therefore required, as it is the entire operating system. The modifications in the "simple updates" options represent only changes to the base install, and therefore require that the base install be completed first. Option 5 is there for experts who fully understand how ubermix works and for tools to solve problems.
By default, option 1 contains everything described on the About page. Option 2: "Advanced image" allows an installer to designate the size of the base system and user changes partitions at install time (see ubermix Customization for details). Simple updates are described on the Customization page, and should only be run on a system that has already been installed per option 1.
Troubleshooting - Model Specific Issues and Instructions
For help with general problems or model specific issues, be sure to check the ubermix wiki. More importantly, if you find a solution to a problem with your particular device, be sure to share it there as well!
System won't boot on restart after install
If your system doesn't boot properly on restart, we recommend that you first look at the next section regarding Newer Windows 8+ and Apple Mac hardware with (U)EFI BIOS for ideas. If nothing there works, there are certain rare circumstances where a pre-existing hard disk partition table will be in a state that is incompatible with the ubermix install. To reset the partition table, boot from the ubermix key, choose option "5 Expert Options", then option "4 Reset partition table".
Some older systems and/or buggy BIOS configurations (Asus, I'm looking at you) have problems recognizing modern partition types, which can prevent a system from booting properly. If you have tried everything else, you can force an old-school partition setup by doing the following: boot from the ubermix key, choose option "5 Expert Options", then option "5 Create a legacy partition map", and follow the instructions that follow.
Newer Windows 8+ and Apple Mac hardware with (U)EFI BIOS
Newer Windows 8+ and Apple hardware implement a different boot mechanism from traditional systems called "(U)EFI". In many cases, hardware capable of running Windows will also support the traditional method utilizing a feature called "legacy mode". If you will be installing on UEFI hardware, we recommend enabling legacy boot, rather than using UEFI, since it's easier to setup. We've seen two different mechanisms for enabling legacy mode in various BIOS implementations: either a "Boot Mode" option that specifically lists 'legacy', or a "CSM" (Compatibility Support Module) that can be enabled to support legacy boot - CSM seems to be most prevalent on Asus hardware. If you already have ubermix installed, your system is in legacy mode, so no changes should be necessary. If the target system is brand new and came with Windows 8+, you will likely need to enable legacy boot in the BIOS.
If your system does not support legacy boot (or is an Apple Mac), then you must use ubermix 3.x or newer - ubermix 1.x does not support UEFI. On non-Apple hardware originally designed for Windows 8+, you must disable UEFI secure boot in your BIOS before ubermix will work. Most BIOS vendors have made this difficult by showing a secure boot enable/disable option that you can't seem to change. What they want you to do is enter a "supervisor" password on the security page first, then they will allow you to make the change. Having a BIOS password is not a bad idea, in my opinion, however if you want to remove it after making the change, simply return to the security screen and set the password back to blank.
USB Keys, Ports and Installation Issues
We have occasionally heard reports of USB related issues with installing ubermix on some devices. If you experience a problem, like and error during the install, the first thing to try is installing from a different USB port. A good rule of thumb is if you have USB ports on both sides of the machine, insert the USB key in the port on the opposite side of the the one that failed and try again. If the install continues to fail, try recreating the USB key using the instructions above. If the install still fails (or is incredibly slow - like 20 minutes), try a different brand of USB key.
Input/Output (gzip) error on the screen on install, followed by other errors
Check your download file and make sure that it is ~2.3Gb in size. If not, then you don't have the whole file. Re-download and try again.
Lots of errors on the screen on install, fails to boot
In certain rare circumstances, it is possible that a pre-existing hard disk partition table will be in a state that is incompatible with the ubermix install. To reset the partition table, boot from the ubermix key, choose option "5 Expert Options", then option "4 Reset partition table"
Blank black or purple(ish) screen on startup
Some older machines with ATI Radeon video cards have trouble starting up with the video driver in a default state. To work around this problem, do the following:
- Reboot the computer and press ESC immediately after your computer manufacturer's splash screen disappears (you should see a flashing cursor in the top left corner for a few seconds - press the escape key within 3 seconds to view the menu.)
- Select "Normal Boot" from the menu (but don't press enter) and press the "e" key on your keyboard
- Select the line in the box that begins with the word "linux" and move the cursor to the end of the line.
- Add a space, then the word 'nomodeset'
- Then press "ctrl+x" on your keyboard to boot